Got a tear or cut in your wetsuit? Not every damaged wetsuit needs replacing. Learn how to repair small cuts with wetsuit glue, fix larger tears with hot melt tape, and stitch damaged neoprene. This step-by-step guide covers the tools, techniques, and when to seek professional repair.
Table of content
What You Need to Repair a Wetsuit
How to Repair Small Wetsuit Tears and Cuts with Glue
How to Repair Larger Wetsuit Tears with Hot Melt Tape
How to Sew and Repair Large Tears in a Wetsuit
What You Need to Repair a Wetsuit
Before you start repairing your wetsuit, make sure you have the right tools and materials ready. What you'll need depends on the size of the tear and the repair method.
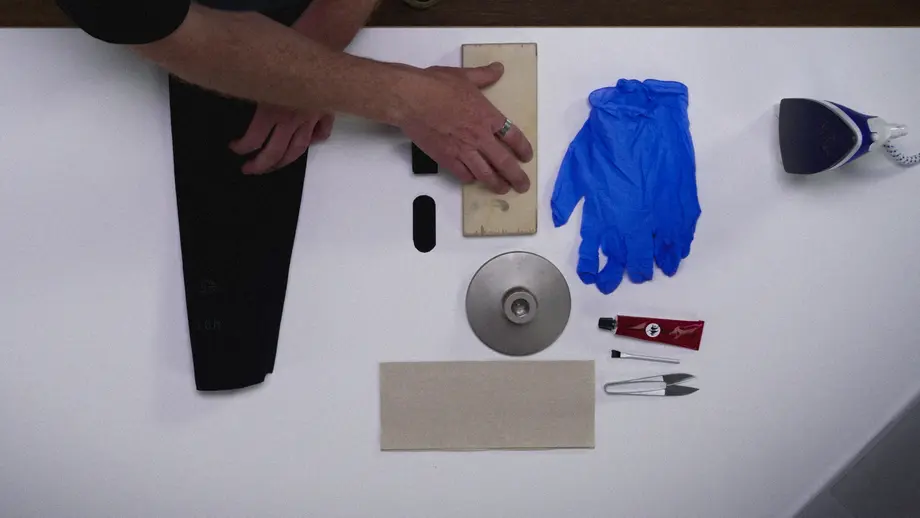
Basic wetsuit repair essentials:
A clean, dry, and well-ventilated workspace
Neoprene glue (wetsuit repair adhesive)
Brush or spatula for applying the glue
Protective rubber gloves
A small, flat piece of wood or cardboard
Additional materials for larger tears:
Hot melt repair tape
Nylon thread and a sewing needle for stitching
And of course, a little patience and time.
How to Repair Small Wetsuit Tears and Cuts with Glue
Small tears and cuts (1–5 cm) in your wetsuit can usually be repaired with neoprene glue. You can find suitable wetsuit repair glue at your local surf shop or online. Before getting started, make sure to read the manufacturer's instructions, as application methods and drying times may vary between products.
Step 1: Clean and dry your wetsuit
Make sure the damaged area is completely dry and free from sand, salt, dust, and other residue.
Step 2: Prepare the damaged area
Carefully remove any loose threads or material around the tear.
Step 3: Place a protective surface underneath
Slide a small, flat piece of wood or cardboard inside the wetsuit, directly beneath the damaged area.
Step 4: Apply the first layer of neoprene glue
Gently open the tear and use a brush to apply a thin, even layer of neoprene glue to both edges. Keep the edges apart.
Step 5: Let the glue dry
Allow the adhesive to air-dry for approximately 3–5 minutes.
Step 6: Apply a second layer
Use the brush to apply another thin layer of neoprene glue, making sure both edges are fully coated.
Step 7: Press the edges together
After another 3–5 minutes of drying time, carefully align the edges and press them firmly together until the adhesive holds.
Step 8: Let the repair set
Leave the repaired area undisturbed for approximately 20 minutes.
Step 9: Turn the wetsuit inside out
Remove the protective piece of wood or plastic and turn your wetsuit inside out.
Step 10: Reinforce the repair from the inside
Repeat the glue application process on the inside of the tear.
Step 11: Allow the glue to cure completely
Let your wetsuit cure for at least 24 hours before getting back in the water.
Important: Always follow the adhesive manufacturer's instructions for application, drying, and curing times, as these may vary between products.
For larger wetsuit tears, additional reinforcement with nylon fabric or stitching may be necessary. Check out the following repair methods to find the right approach for your wetsuit.

How to Repair Larger Wetsuit Tears with Hot Melt Tape
Larger tears and cuts in your wetsuit may need extra reinforcement, especially in areas exposed to frequent movement or high stress. Hot melt repair tape helps strengthen the damaged area after gluing. Alternatively, you can reinforce the repair with stitching or combine both methods for additional support.
Step 1: Prepare Your Wetsuit
Before applying hot melt tape, make sure you've already repaired the tear with neoprene glue as described in the previous section. Place a flat piece of wood or cardboard inside your wetsuit, directly underneath the damaged area. This provides a stable surface for ironing on the hot melt tape.
Step 2: Cut the Hot Melt Tape to Size
Choose a suitable hot melt repair tape, ideally matching the color of your wetsuit. Cut a patch that extends approximately 5 mm beyond the tear on all sides. For example, a 2 cm tear requires a patch at least 3 cm long.
Step 3: Round the Corners
Trim the corners of your hot melt patch into a rounded shape. Sharp corners are more likely to lift or peel off over time, while rounded edges help the repair stay in place.
Step 4: Position the Hot Melt Patch
Place the prepared hot melt tape over the repaired tear. Make sure the patch is properly aligned and completely covers the damaged area, including the additional 5 mm around the edges.
Step 5: Iron On the Hot Melt Tape
Set your iron to the temperature recommended by the hot melt tape manufacturer. Carefully apply heat to the patch, keeping the iron moving in small circular motions.
Avoid holding the iron in one spot for too long, as excessive heat can damage the neoprene and synthetic lining materials.
Important: Follow the manufacturer's temperature instructions and use a protective cloth between the iron and the wetsuit if required.
Step 6: Check the Adhesive Activation
As you apply heat, watch for the edges of the hot melt patch to turn slightly white. This indicates that the adhesive is softening and starting to bond with the wetsuit lining.
Continue moving the iron gently until the patch is properly bonded, following the manufacturer's instructions.
Step 7: Let the Repair Cool and Cure
Once the hot melt patch is applied, leave the repaired area undisturbed for at least 20 minutes. Then carefully remove the wood or cardboard from inside the wetsuit.
Allow the repair to cure for 24 hours before using your wetsuit again, or longer if recommended by the hot melt tape manufacturer.

How to Sew and Repair Large Tears in a Wetsuit
Larger tears and cuts in your wetsuit may need extra reinforcement, especially in areas exposed to frequent movement or high stress. Stitching the damaged area with nylon thread can help strengthen the repair and prevent the tear from reopening. For best results, glue the torn edges together before sewing. You can also combine stitching with hot melt tape for additional reinforcement.
Step 1: Prepare Your Wetsuit
Make sure your wetsuit is clean, dry and free from salt, sand and other residue. Place a flat piece of wood inside your wetsuit, directly underneath the damaged area. This provides a stable surface while repairing the tear.
Step 2: Apply Neoprene Glue to the Tear
Gently open the tear and use a brush to apply a thin, even layer of neoprene glue to both exposed edges. Make sure the entire surface is coated, but avoid applying too much glue or getting adhesive on the wetsuit lining.
Step 3: Let the Glue Become Tacky
Allow the neoprene glue to air-dry until it becomes slightly tacky and develops a matte finish. This indicates that the adhesive is ready to bond. Follow the glue manufacturer's instructions for the recommended drying time.
Step 4: Press the Tear Edges Together
Carefully align the edges of the tear and press them firmly together. Make sure the repaired surface is smooth and even, without any noticeable gaps or raised edges.
Let the glued area rest for approximately 20 minutes before stitching.
Step 5: Prepare Your Needle and Thread
Use a thin sewing needle and nylon thread to reinforce the repair. Unlike cotton, nylon thread doesn't readily absorb water, making it a better choice for wetsuit repairs.
Cut approximately 50 cm of nylon thread, depending on the size of the tear, and tie a small knot at one end.
Important: Avoid stitching through the full thickness of the neoprene. This helps maintain the wetsuit's comfort and reduces the risk of water entering through the needle holes.
Step 6: Start Stitching the Wetsuit
Start stitching slightly before the beginning of the tear. Gently pinch or bend the neoprene to make it easier to guide the needle through the outer layer without piercing the entire thickness.
Pull the thread through until the knot holds it in place.
Step 7: Reinforce the Tear with Cross Stitches
Use a cross-stitch pattern to reinforce the glued tear. Guide the needle diagonally across the repaired area to create an X-shaped stitch.
Continue stitching along the tear, repeating the cross-stitch pattern while keeping the thread secure.
Try to avoid pushing the needle through the full thickness of the neoprene.
Step 8: Secure the Thread
Once you've reached the end of the tear, secure the stitching with two or three small knots.
You can create a knot by passing the needle underneath the last stitch, catching a small section of the lining and pulling the thread through the loop.
Trim off any excess thread with scissors.
Step 9: Reinforce the Stitching with Neoprene Glue
For additional security, apply a small amount of neoprene glue to the thread ends and knots. This helps prevent the stitching from coming loose over time.
Allow the adhesive to cure fully according to the manufacturer's instructions before using your wetsuit again.

Repair Limitations
Larger repairs, 10 cm and bigger, torn-off parts, and zippers should be handled by a trained person.
Repairs and modifications of any kind to the wetsuit will always result in the product losing its certification.
When using repairs with hot melt, follow the instructions and guidelines provided by the respective manufacturer.
When to Call the Pros?
However, not every damage can be fixed by yourself. At these times, the product must be taken for repair to ensure continued enjoyment and performance on the water. For those who want to be sure, we recommend bringing the product regularly to a specialist for a thorough inspection. This ensures that performance and fun on the water are always maintained. A specialist can detect potential weak points early and make all necessary repairs or adjustments to keep your gear in top condition.